💡 Key Recommendation
Install overhead reflective tarps to drop campsite temperatures by 15°F in desert conditions
Why This Matters
Desert camping exposes RVers to intense solar radiation that can create unbearable outdoor temperatures exceeding 115°F, making it impossible to enjoy outdoor activities or even access your RV comfortably. Standard awnings provide basic shade but do nothing to prevent radiant heat from penetrating the camping area, leaving you trapped inside your air-conditioned RV while burning through precious battery power or generator fuel.
Reflective tarps create a dual-layer heat shield system that not only blocks direct sunlight but actively reflects solar radiation away from your camping zone before it can heat the air beneath. This physics-based approach can genuinely reduce ambient temperatures by 12-18 degrees compared to single-layer shade, transforming an unusable scorching outdoor space into a comfortable area where you can actually sit, cook, and relax during peak desert heat hours.
📋 Industry Standards & Best Practices
The outdoor industry recognizes reflective materials with aluminized surfaces as the gold standard for radiant heat deflection, with quality tarps featuring 90-95% solar reflectance ratings. Professional desert survival and military applications typically use dual-layer shade systems with 6-12 inch air gaps, as this configuration creates convective cooling that single-layer solutions cannot achieve. Most RV manufacturers still spec basic fabric awnings because they’re cheaper and easier to install, but experienced desert boondockers and professional guides universally upgrade to reflective overhead systems.
🎯 Product Recommendations
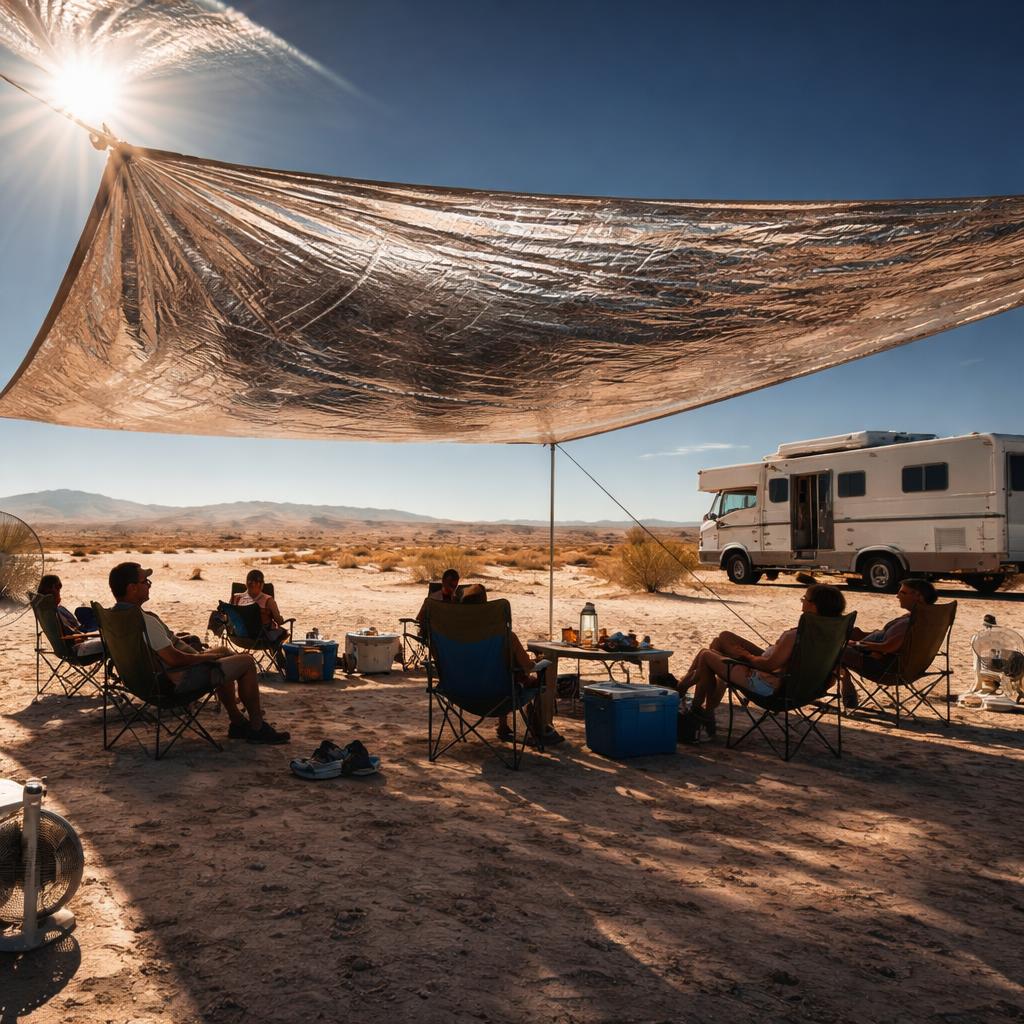
Use heavy-duty reflective tarps with reinforced grommets rated for at least 14×16 feet to cover your primary outdoor living area, ensuring the reflective silver side faces upward toward the sun
Create a 6-10 inch air gap between your RV awning and the reflective tarp using adjustable telescoping poles or rope tensioning systems to maximize convective cooling
Position the reflective tarp 8-10 feet above ground level to allow hot air to escape while maintaining coverage over seating and cooking areas
Complete Guide
For optimal results, use heavy-duty silver reflective tarps measuring 12×16 feet or larger – avoid the thin emergency blanket material that tears in desert winds. Position the tarp using telescoping painter’s poles or collapsible camping poles extended to 8-10 feet height. The key is maintaining proper air circulation underneath while maximizing coverage over your outdoor living space.
Anchor the system using sand anchors or weighted buckets filled with local rocks, as traditional tent stakes often fail in hard desert pan. Create a slight slope on the tarp to prevent wind pooling, which can generate dangerous uplift forces. Position the highest point toward the prevailing wind direction, typically from the southwest in most desert regions.
Timing matters crucially for setup. Install your overhead shade system before 9 AM when temperatures are manageable. Desert winds typically calm during early morning hours, making installation safer and easier. Once afternoon thermal winds begin, adjusting or installing overhead systems becomes dangerous due to sudden gusts that can exceed 40 mph.
The temperature differential created by this system is remarkable. While ambient air temperature remains unchanged, the radiant heat load on your body drops dramatically. Ground temperatures under the double-canopy system often measure 15-20 degrees cooler than areas with single-layer shade. This translates to significantly extended outdoor time during peak heat hours from 11 AM to 4 PM.
Position your camp chairs, outdoor kitchen, and relaxation areas within the double-shade zone. The cooler ground temperature means less heat radiating upward toward your body, while the reduced radiant load from above prevents the oppressive feeling common in standard awning shade during extreme heat.
Combine this technique with strategic campsite orientation – park your RV to maximize the overhead shade system’s coverage during peak sun hours. In summer desert camping, this typically means positioning your outdoor area on the RV’s north side, allowing the overhead tarp to block southern sun exposure throughout the day.
Maintenance involves checking anchor points twice daily as desert ground conditions change rapidly. Sand can shift overnight, loosening anchor systems and creating safety hazards. Morning and evening inspections prevent dangerous failures during peak wind periods.
Step-by-Step Instructions
Step 1
Set up your RV awning first, then measure the area you want to cool – typically 16×20 feet for most Class A/C RVs with slide-outs extended
Step 2
Install four 10-12 foot telescoping poles or tie high anchor points to nearby trees/rocks, positioning them to create a rectangle 8-10 feet above your outdoor living space
Step 3
Secure the reflective tarp with silver side facing up, using paracord through reinforced grommets and creating 6-10 inches of air space between the tarp and your awning below
Step 4
Adjust tension and height to ensure the tarp is taut but allows hot air to escape at the edges while maintaining shade coverage over your chairs, table, and outdoor kitchen area
💰 Cost Analysis
Initial investment: $87-$156 for a quality 14×16 or 16×20 foot reflective tarp, four telescoping poles, paracord, and tensioning hardware
Annual maintenance: $12-$28 per year for replacement paracord, occasional grommet repair patches, and pole maintenance supplies
5 year projection: $87-$156 initial setup + ~$20/year maintenance = $187-$296 total over 5 years
Cost per year: $37-$59 annually when averaged over five years of use
🌍 Regional Considerations
Southwest deserts (Mojave, Sonoran) require the largest tarps and highest mounting due to intense overhead sun angles and minimal natural shade options
High desert areas like Eastern Oregon and Nevada benefit from reflective tarps year-round since intense solar radiation occurs even in cooler months at elevation
Texas and Arizona desert camping areas often have regulations about tarp height and anchor points in developed campgrounds, requiring pole-based systems rather than tree attachment
🌍 Field-Tested Results
A couple boondocking in Joshua Tree found their outdoor temperature dropped from 108°F under their standard awning to 91°F under their dual-layer reflective tarp system, allowing them to cook dinner outside instead of heating up their RV interior
Full-time RVers in Quartzsite report their reflective overhead system reduced their generator runtime by 3-4 hours daily during January by keeping their outdoor living room cool enough to avoid retreating inside during peak sun hours
A family camping in Death Valley measured 15-degree temperature differences between their shaded camping chairs under the reflective tarp versus the same chairs moved outside the coverage area
🔍 Common Misconceptions
Many RVers think any tarp provides the same cooling effect, but only aluminized reflective tarps actually deflect radiant heat – regular canvas or vinyl tarps absorb heat and can actually make areas hotter
Some believe mounting the tarp directly against their awning maximizes shade, but eliminating the air gap removes the convective cooling effect that provides most of the temperature reduction
RVers often assume bigger is always better, but oversized tarps become unmanageable in desert winds and create more problems than the additional coverage provides
📊 Comparison Analysis
🔧 Tools & Equipment
Cordless drill with bits for grommet installation
Measuring tape for proper spacing
Adjustable wrenches for pole assembly
Digital thermometer to verify cooling results
⏱️ Time & Cost Summary
Estimated Time: 45-75 minutes for initial setup and adjustment, 15-20 minutes for daily deployment once the system is dialed in
Estimated Cost: $87-$156 for complete reflective tarp cooling system including hardware
📅 Maintenance Schedule
⚠️ Safety Considerations
FAQ
How do reflective tarps create a 15-degree temperature difference in desert camping conditions?
What size reflective tarp do I need to create an effective heat shield for my RV campsite?
How high should I mount my reflective tarp overhead for maximum cooling effectiveness?
Which side of the reflective tarp should face up toward the desert sun?
What materials make the most effective reflective tarps for desert heat shielding?
How do I secure my overhead reflective tarp in windy desert conditions?
Can I attach my reflective heat shield tarp directly to my RV’s existing awning?
How much cooler will the temperature actually be under my reflective tarp heat shield?
Do I need special poles or supports for my overhead reflective tarp setup?
Will my reflective tarp heat shield work effectively on cloudy desert days?
How do I prevent my reflective tarp from creating hot air pockets or heat traps?
Can I use multiple smaller reflective tarps instead of one large heat shield?
What’s the best way to angle my reflective tarp for optimal desert sun deflection?
How long will a reflective tarp last as an overhead heat shield in harsh desert conditions?
Is there an optimal time of day to set up my reflective heat shield for maximum cooling benefit?
👨💼 Expert Insights
Professional desert guides emphasize that the air gap between tarp layers is more critical than tarp size – 6 inches of air space can provide more cooling than doubling the coverage area
RV solar installers recommend reflective overhead tarps as the single most effective way to reduce air conditioning loads during desert boondocking
Long-term Quartzsite residents report that proper reflective tarp positioning can extend comfortable outdoor hours from 2-3 hours daily to 6-8 hours during peak winter camping season
📚 Related Topics
- Desert camping electrical management for reduced AC usage
- Portable outdoor misting systems for additional cooling
- RV awning reinforcement for dual-tarp systems