💡 Quick Tip
Consider deploying reflective mylar ground barriers before sunset when camping in near-freezing conditions – as a supplemental layer of cold-weather protection alongside proper RV winterization.
Introduction
Many RVers focus on insulating walls, windows, and roofs when preparing for cold weather, while paying less attention to the ground beneath their rig. Frozen ground can act as a heat sink, drawing warmth away from your RV’s underbelly – including water lines – through radiant heat transfer.
Placing reflective mylar sheets on the ground beneath your RV may help reduce this heat loss. Mylar primarily reflects radiant heat, which can provide a small thermal benefit depending on conditions. However, it does not significantly address conductive heat loss to the frozen ground itself.
How It Works
Your RV’s heated interior warms the floor, which radiates heat downward toward the ground. When soil temperatures drop below freezing, this can pull warmth away from freshwater lines, gray tanks, and other components mounted in the underbelly.
Mylar sheets placed reflective-side up beneath your RV’s sleeping or plumbing area can bounce some of that radiated energy back toward the rig’s undercarriage. This may help delay heat loss in mild conditions, though the effect varies depending on temperature, ground conditions, wind, and how well the RV is otherwise insulated.
For comparison, other solutions like foam board insulation, RV skirting, or heated tanks typically offer more robust freeze protection. Mylar is best understood as a lightweight, portable supplement – not a replacement for those methods.
📋 General Best Practices
General best practices in RV cold-weather prep suggest using reflective barriers with high reflectivity ratings for cold-weather applications. Where possible, leave a small air gap between the mylar and both the ground and the RV belly, as trapped air provides additional insulation. Coverage should extend at least 2 feet beyond the bed perimeter or the plumbing area you’re trying to protect.
🎯 Product Recommendations
Use heavy-duty mylar emergency blankets (5-mil) rather than thin survival blankets – they hold up better on rough ground and resist tearing from rocks or debris.
Position the mylar sheets so they extend 18–24 inches beyond your mattress or plumbing footprint on all sides to create a reasonable buffer zone.
Secure sheets with landscape staples or weighted rocks around the perimeter to prevent wind displacement overnight.
Complete Guide
Standard RV skirting helps block wind-driven cold, but the ground beneath your rig can remain at sub-freezing temperatures even when air temps are mild. Reflective mylar sheets – the same kind hikers carry for emergencies – offer one way to address this gap.
Purchase heavy-duty 60″ x 84″ versions from camping suppliers rather than flimsy first-aid kit types. A typical Class C motorhome may need three to four blankets; most travel trailers can be covered with two.
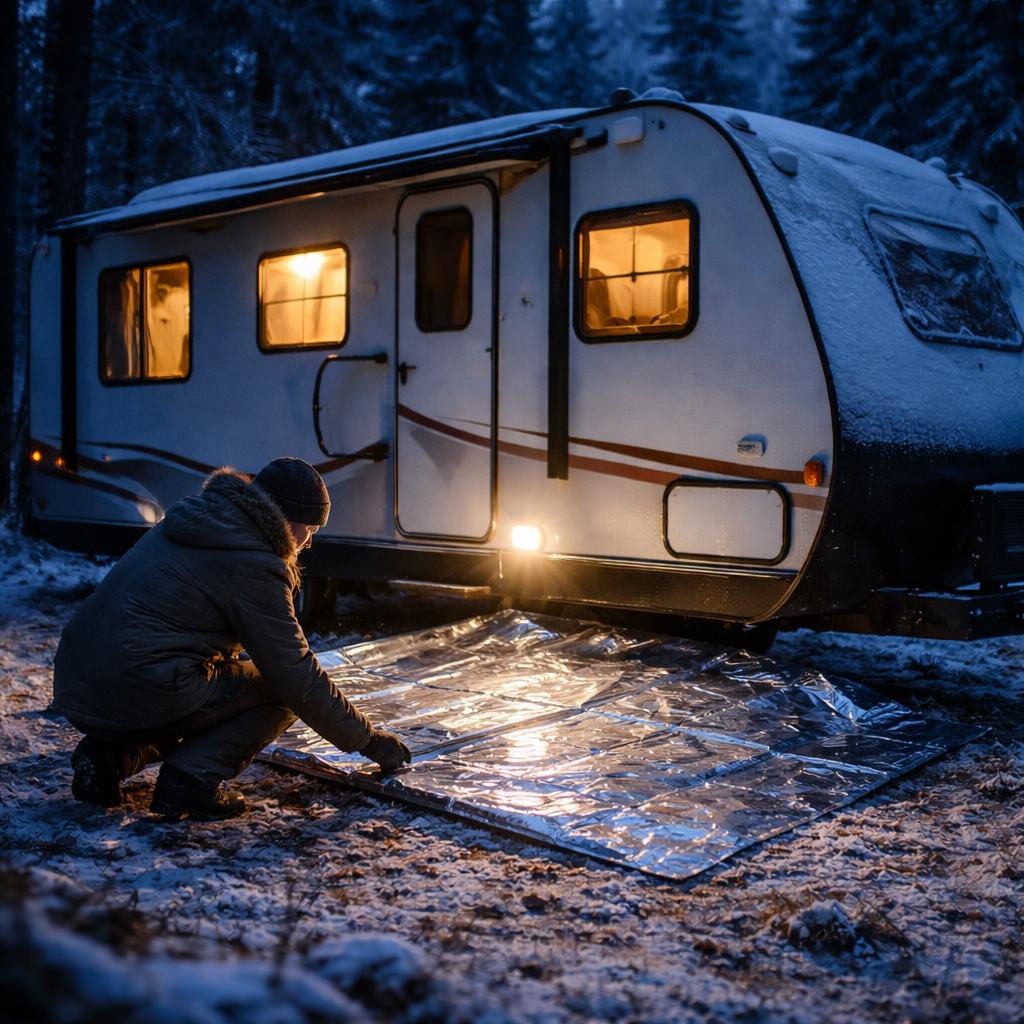
Deploy your sheets before sunset, when ground temperatures begin to drop. Lay them directly beneath your RV’s freshwater tank and plumbing runs – typically centered under the main living area – with the reflective side facing up toward the rig’s belly. You don’t need to cover your entire RV footprint; focus on the 6–8 foot zone where your plumbing and tanks are located.
Overlap sheets by a few inches if you need more coverage, and weight the corners using leveling blocks, a spare tire, or collected rocks to prevent wind displacement. Running a small amount of water through your system every couple of hours during the coldest part of the night (typically between 2 AM and sunrise) can also help, since moving water is more resistant to freezing than static water.
Avoid placing mylar directly on wet or muddy ground – moisture can freeze to the material and complicate morning retrieval. If precipitation is expected, lay a cheap plastic tarp beneath the reflective layer as a moisture barrier.
Step-by-Step Instructions
Step 1
Locate the ground area directly beneath your RV’s sleeping area or main plumbing runs by measuring from inside the RV and marking the corresponding outdoor positions.
Step 2
Clear the ground of sharp rocks, sticks, and debris that could puncture the mylar, then lay out your reflective sheets with the shiny surface facing upward toward the RV floor.
Step 3
Overlap multiple sheets by 6–8 inches if needed, using duct tape to seal the seams and create one continuous barrier.
Step 4
Secure the perimeter with landscape staples, tent stakes, or heavy rocks placed every 2–3 feet around the edges to keep the sheets flat and taut overnight.
💰 Cost Analysis
Initial investment: $18–$35 for heavy-duty mylar emergency blankets, landscape staples, and duct tape for seaming
Annual maintenance: $8–$15/year for replacement mylar sheets due to wear, punctures, or UV degradation
5-year projection: Approximately $58–$110 total over 5 years
Cost per year: Approximately $12–$22/year averaged over 5 years of cold-weather camping
🌍 Regional Considerations
Desert Southwest: Choose UV-resistant mylar or plan for more frequent replacement due to intense daytime sun degradation. Extra securing is also recommended given high winds.
Northern Plains and Mountain Regions: Deeper ground frost may call for larger coverage areas extending 3–4 feet beyond your plumbing zone.
Pacific Northwest: Wet conditions require waterproof backing or plastic sheeting under the mylar to prevent moisture from reducing reflective properties.
🌍 Practical Examples
A couple camping in Yellowstone in October placed mylar sheets under their bedroom slide-out during a night that dropped to 18°F. Their freshwater lines remained flowing while some neighboring RVs without ground barriers experienced frozen pipes – though conditions and RV setups varied.
A solo RVer in Colorado used overlapping emergency blankets under his dinette bed conversion during a three-day cold snap with temperatures below 10°F, and reported that his gray tank did not freeze solid – though he also kept his interior heat running continuously.
Many RVers report using this method as an additional layer of protection during shoulder-season camping, particularly when overnight temps dip just below freezing and full winterization isn’t yet practical.
🔍 Common Misconceptions
Myth: The mylar needs to touch the RV’s undercarriage to work. Reality: Mylar works through radiant reflection and may actually perform better with a small air gap between the sheet and both the ground and RV belly, as trapped air provides additional insulation.
Myth: Any shiny material works as well as mylar. Reality: Purpose-made mylar emergency blankets have higher reflectivity than aluminum foil or reflective tarps. Foil tears easily and doesn’t conform well to ground surfaces.
Myth: Covering the entire RV with mylar provides better protection than focusing on the sleeping or plumbing area. Reality: Concentrated coverage over your water lines and sleeping zone is generally more practical and effective than thinly spreading sheets across the entire undercarriage.
📊 Comparison: Mylar vs. Other Options
Mylar emergency blankets ($12–18 each): A lightweight, portable supplement that packs down small and costs little. Best for mild freeze protection. Durability varies – heavy-duty 5-mil versions last 2–3 seasons with care, while thin survival blankets may tear after one rough outing.
Foam board insulation ($20–50): More rigid and durable, provides better conductive insulation in addition to some radiant benefit. Harder to pack and store.
RV skirting ($100–500+): Creates an enclosed air space around the entire underbelly, significantly reducing wind chill and heat loss. Much more effective in sustained cold. Bulkier and more expensive.
Heated tanks and heat tape ($50–200+): Directly heats vulnerable components. The most reliable option for sustained sub-freezing conditions.
Mylar is best positioned as a low-cost supplement to these methods, particularly useful for boondocking in national forests during late fall and early spring when overnight freezes are possible but daytime temperatures remain comfortable.
🔧 Tools & Equipment
Measuring tape to determine the exact ground area beneath your sleeping or plumbing area
Landscape staples or tent stakes for securing mylar sheet corners and edges
Duct tape for sealing overlapping seams between multiple sheets
Work gloves to prevent cuts from sharp mylar edges during installation
⏱️ Time & Cost Summary
Estimated Time: 15–25 minutes for initial setup, plus 5 minutes each evening to check and re-secure any loose edges
Estimated Cost: $18–$35 for a complete setup including heavy-duty mylar sheets, securing materials, and seaming supplies
📅 Maintenance Schedule
⚠️ Safety Considerations
FAQ
How do reflective mylar sheets help reduce the risk of RV water line freezing?
Mylar sheets reflect radiant heat back toward your RV’s underbelly, which may help reduce the rate of heat loss from the floor and nearby water lines in mild conditions. This is a supplemental effect – not a guaranteed freeze prevention method, especially in extreme cold.
Where should I place the mylar sheets?
Place them directly on the ground beneath your RV’s bedroom and/or main plumbing runs, reflective side facing up. If your water lines are located away from the sleeping area, prioritize coverage under the lines themselves.
What thickness of mylar is best?
Heavy-duty mylar sheeting of at least 2–4 mil thickness provides adequate durability for ground placement while maintaining good reflective properties. Thinner survival blankets tear too easily for regular use.
How large should the mylar sheet be?
Aim to extend coverage at least 2–3 feet beyond the perimeter of the area you’re protecting. For most RV bedrooms, a 10×12-foot area is a reasonable starting point.
At what temperature should I start using mylar sheets?
Consider deploying them when nighttime temperatures are forecast to drop to around 35°F (2°C) or below. This provides a buffer before reaching the freezing point. In temperatures well below freezing, combine this method with stronger protections like tank heaters or skirting.
Do I need to secure the mylar to the ground?
Yes – use tent stakes, rocks, or sandbags around the perimeter. Unsecured sheets can shift or blow away overnight, eliminating any benefit.
Can I reuse the same mylar sheets?
Yes, quality sheets can be reused multiple times with careful handling. Clean off dirt after each use, inspect for damage, and store them rolled in a dry place between trips.
What if my water lines are not under the sleeping area?
Place the mylar directly under the areas where your water lines actually run, not just under the bed. Coverage is most useful where the vulnerable plumbing is located.
Should the shiny side face up or down?
Shiny side up, toward your RV floor. This reflects radiant energy back toward the underbelly rather than into the ground.
What if frost still forms on my water lines despite using mylar?
In extreme cold, mylar alone is unlikely to be sufficient. Add heat tape, tank heaters, or RV skirting for more reliable protection. Mylar works best as part of a layered approach.
Can I use regular aluminum foil instead?
Aluminum foil tears easily, doesn’t conform well to ground surfaces, and lacks the durability needed for reliable outdoor use. Mylar emergency blankets are a better choice for this application.
Are there any safety concerns?
Ensure sheets don’t create tripping hazards, secure them so they don’t blow away, and make sure they don’t interfere with leveling jacks or stabilizers. Mylar is very slippery when wet – avoid walking on installed sheets.
👨💼 Expert Perspectives
An RV technician with 15 years of winterization experience notes: “I’ve seen more freeze damage from ground frost than from ambient air temperature – many RVers spend money on roof vents and window covers while overlooking the frozen ground pulling heat out beneath them.”
A professional RV inspector notes that a reflective ground barrier can provide a small thermal benefit in certain conditions, but strongly recommends combining it with other measures like heat tape or skirting when temperatures are expected to drop well below freezing.
Full-time RVers who camp year-round often describe adding a ground barrier as a helpful supplemental measure during shoulder-season trips, particularly when overnight temps dip just below freezing and they aren’t running full heat all night.