💡 Key Recommendation
Check your fresh water tank vent monthly to prevent costly tank replacement and pump burnout
Complete Guide
Most RVers never think about their fresh water tank vent until catastrophic failure occurs, but this small component prevents thousands of dollars in damage when properly maintained. The fresh water tank vent allows air to enter the tank as water is drawn out, preventing vacuum formation that can literally crush your tank like a soda can.
The symptoms start subtly: your water pump runs longer than usual to build pressure, or you notice slight denting in flexible polyethylene tanks. Advanced cases show severe tank deformation, constant pump cycling, and eventual pump motor burnout from overwork. Many RVers mistake these signs for pump failure and spend $200-400 replacing pumps that were actually working correctly.
Fresh water tank vents are typically 1/2-inch PVC pipes extending through the RV’s exterior wall, often terminating in a small cap or 90-degree elbow. They’re usually located near the tank, but can be surprisingly difficult to locate on some models. Check your owner’s manual or look for a small white pipe protruding from the sidewall, typically 12-18 inches above the tank level.
Blockages occur from multiple sources: spider webs are the most common culprit, as spiders love these protected cavities for nesting. Mud dauber wasps also target vents, creating clay plugs that completely seal the opening. Ice formation during winter camping can block vents temporarily, while road debris, leaves, or accumulated dirt gradually restrict airflow.
To diagnose a blocked vent, first observe tank behavior during water draw. Turn on a faucet and listen for unusual gurgling sounds from the tank area – this indicates air struggling to enter through a restricted vent. Check the tank exterior for any denting or deformation, which occurs when vacuum pressure exceeds the tank’s structural strength. Polyethylene tanks show obvious concave surfaces, while rigid tanks may crack at stress points.
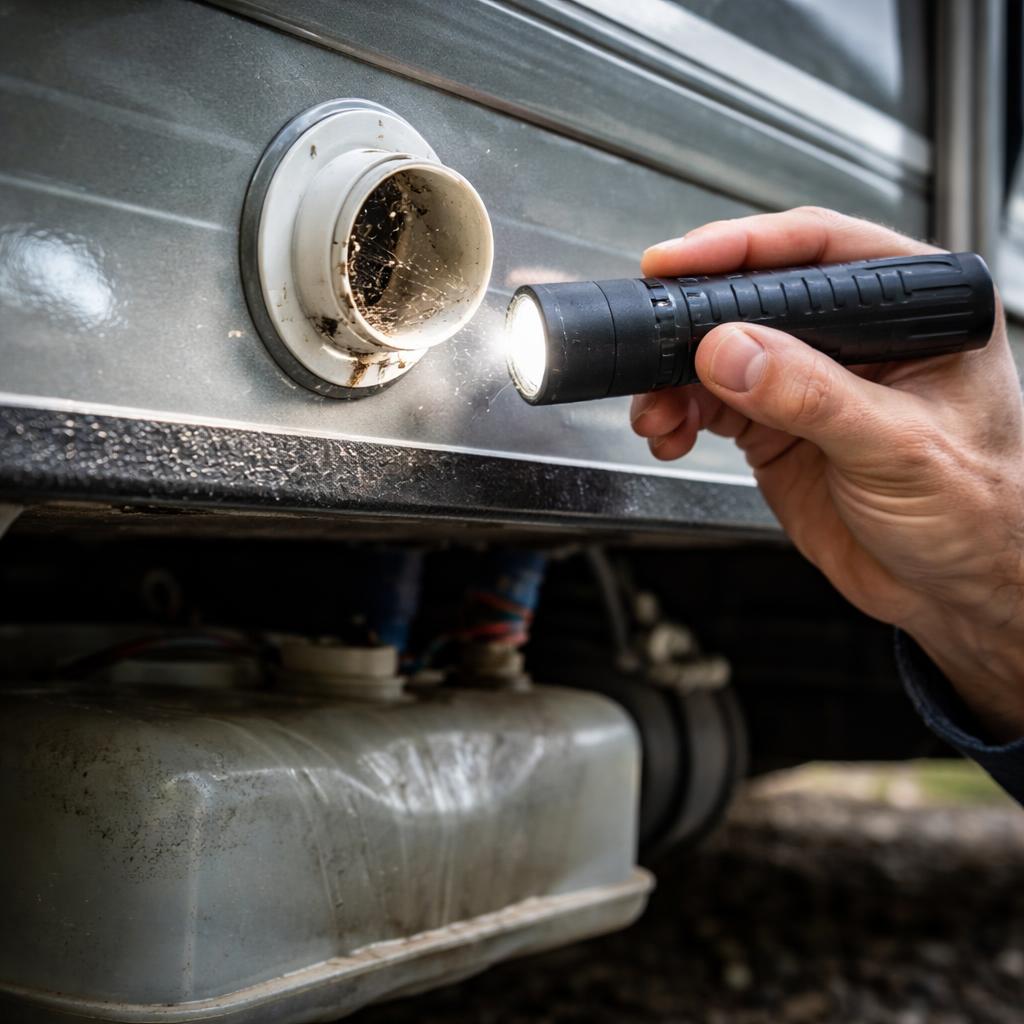
For testing, locate the vent opening and visually inspect with a flashlight. You should see clear airflow space – any obstruction requires immediate attention. Blow gently into the vent while someone listens at the tank; you should hear air bubbling into the water. No sound indicates complete blockage.
Clearing blockages requires different approaches depending on the obstruction type. Spider webs clear easily with a thin wire, pipe cleaner, or compressed air blown from inside the RV if you can access the vent line. Mud dauber nests need careful removal with a small screwdriver or awl – these clay structures are surprisingly hard. Never use excessive force that could damage the vent pipe.
For stubborn blockages, disconnect the vent line inside the RV if accessible. Most connect with simple slip fittings near the tank. Clear the line completely, then flush with water to remove all debris. Check that the exterior vent cap isn’t damaged or missing – replacement caps cost $5-8 and prevent most future blockages.
Preventive maintenance involves monthly visual inspection and quarterly function testing. Install vent screens or covers designed for RV applications if your rig lacks protection. During winter storage, ensure vents remain clear and consider temporary covers in areas with heavy insect activity. This simple maintenance prevents tank replacement costs ranging from $400-1,200 depending on size and configuration.
FAQ
What are the early warning signs that my RV fresh water tank vent is becoming blocked?
Early signs include the tank making unusual noises when filling or draining, slower than normal filling speeds, gurgling sounds from the tank area, difficulty getting water to flow from faucets even with a full tank, and visible deformation or ‘sucking in’ of flexible tank walls. You may also notice the water pump cycling more frequently or struggling to maintain pressure.
How can I visually inspect my fresh water tank for collapse damage caused by vent blockages?
Look for inward deformation of tank walls, especially on flexible plastic tanks that may show permanent creasing or dimpling. Check for stress cracks around fittings and seams. On rigid tanks, look for hairline cracks or bulging around connection points. Use a flashlight to inspect the tank’s underside and sides, and gently press on flexible areas to feel for weak spots that don’t spring back to their original shape.
What diagnostic steps should I take to confirm a fresh water tank vent blockage?
First, locate your tank vent (usually a small pipe extending from the tank to the RV’s exterior). Check if air flows freely by blowing gently into the vent line. Remove the vent cap and inspect for obvious obstructions like spider webs, debris, or ice. Test tank filling speed compared to normal operation. Monitor for vacuum formation by listening for sucking sounds during water usage. Use a small mirror or phone camera to inspect hard-to-see vent areas.
How do vent blockages specifically cause damage to my RV water pump?
When the tank vent is blocked, the pump must work against increasing vacuum pressure as water is drawn from the tank. This causes the pump to run longer cycles, work harder to maintain pressure, and potentially run dry if it can’t draw water effectively. The increased workload leads to overheating, premature wear of internal components, seal failure, and eventual motor burnout. The pump may also short-cycle as it struggles to maintain consistent pressure.
What tools do I need to properly diagnose fresh water tank vent issues?
Essential tools include a flashlight or headlamp, small mirror for inspecting tight spaces, compressed air canister or small air compressor, thin wire or pipe cleaner for probing blockages, screwdrivers for removing vent caps, pliers for disconnecting fittings, and a multimeter to test pump operation. A smartphone camera with flash can help inspect hard-to-reach areas, and a water pressure gauge can help identify pump performance issues.
How can I test if my fresh water tank vent is allowing proper airflow?
Remove the external vent cap and place your hand over the opening while someone operates a faucet inside the RV. You should feel air being drawn in as water flows out. Alternatively, gently blow into the vent line while listening at the tank – you should hear air bubbling. Use a tissue or lightweight material near the vent opening to see if it’s drawn toward the vent during water usage. A properly functioning vent will show clear airflow during these tests.
What are the most common causes of fresh water tank vent blockages I should look for?
Common blockages include spider webs and insect nests at the external vent opening, ice formation in cold weather, debris like leaves or dirt blown into the vent, collapsed or kinked vent lines inside the RV, manufacturing defects like internal tank baffles blocking the vent connection, and improperly installed vent caps that restrict airflow. Mud dauber wasps are particularly notorious for plugging RV vents with mud.
How do I know if my water pump damage is specifically caused by vent blockage versus other issues?
Vent-related pump damage typically occurs alongside visible tank deformation and poor water flow despite adequate tank levels. The pump will show signs of overwork like excessive heat, longer run times, and difficulty maintaining pressure specifically when drawing from the tank (not when connected to city water). Other pump issues usually affect all water sources equally. Check if the pump works normally when bypassing the tank or using city water connection.
What sounds should I listen for when diagnosing fresh water tank vent problems?
Listen for gurgling or bubbling sounds from the tank area when using water, which indicates air trying to enter through the plumbing instead of the blocked vent. A ‘sucking’ or vacuum sound when filling the tank suggests restricted airflow. The water pump may make labored or strained sounds, run longer than normal, or cycle on and off rapidly. When filling the tank, a properly vented tank fills smoothly and quietly, while a blocked vent causes irregular filling sounds.
How can I check if my fresh water tank has suffered structural damage from vent blockage?
Inspect flexible tanks for permanent deformation, creasing, or areas that don’t return to normal shape when pressed. Check all fittings and connections for stress cracks or leaks that developed due to vacuum pressure. Look for separation at seams or joints. On rigid tanks, examine for hairline cracks or distortion around the tank body. Perform a pressure test by filling the tank and checking for leaks, and monitor if the tank holds its shape properly under normal use.
What is the relationship between tank collapse and vent blockage in RV fresh water systems?
When the vent is blocked, water flowing out of the tank creates a vacuum inside since air cannot enter to replace the displaced water. This vacuum pressure pulls inward on tank walls, causing flexible tanks to collapse or deform and creating stress on rigid tank structures. The greater the water usage without air replacement, the stronger the vacuum becomes, leading to progressive damage until the vent blockage is cleared or the tank fails.
How do I locate the fresh water tank vent on my RV for diagnostic purposes?
The vent typically appears as a small pipe (usually 1/2 to 3/4 inch diameter) extending through the RV’s floor, wall, or roof near the tank location. Look for a small capped pipe on the RV’s exterior, often white or black plastic. Check your RV’s manual for specific locations. The vent line usually runs from the top of the tank to the exterior, so trace plumbing lines from the tank area. Some vents are integrated with the tank’s filler neck assembly.
What pressure symptoms indicate my fresh water tank vent is blocked during operation?
You’ll notice decreased water flow from faucets despite adequate tank levels, the water pump struggling to maintain pressure and running longer cycles, difficulty filling the tank with slower fill rates, and a vacuum effect where removing the tank fill cap creates a ‘whooshing’ sound. The pump may also lose prime more easily or fail to draw water effectively, and you might experience inconsistent water pressure throughout the RV’s plumbing system.
How can I differentiate between partial and complete fresh water tank vent blockages?
Partial blockages cause gradual symptoms like slightly reduced water flow, occasional pump cycling, and minor tank deformation that may be intermittent. Complete blockages create immediate and severe symptoms including rapid tank collapse, pump failure to maintain pressure, inability to fill the tank properly, and strong vacuum effects. Partial blocks may worsen over time, while complete blocks cause immediate, noticeable problems that prevent normal water system operation.
What emergency diagnostic steps should I take if I suspect sudden fresh water tank collapse from vent blockage?
Immediately stop using water from the tank to prevent further damage. Check the external vent for obvious blockages and remove if safe to do so. Switch to city water connection if available to bypass the tank system. Visually inspect the tank for severe deformation or damage. Turn off the water pump to prevent further strain. If the tank is severely collapsed, avoid refilling until the vent is cleared and tank integrity is verified, as filling a damaged tank can cause complete failure.