RV Leveling & Stabilization Guide: How to Level, Stabilize, and Set Up Your RV Correctly
Leveling and stabilizing are two different jobs. Confusing them is the most common – and most damaging – RV setup mistake.
Introduction: Two Jobs, Not One
Most new RV owners arrive at their first campsite and immediately start cranking the stabilizer jacks. The RV is rocking, the jacks stop the rocking, so they must be doing the job. What they are actually doing is stabilizing an unlevel RV – and that is a different problem from the one they think they are solving.
Leveling corrects the angle of the RV. Stabilizing reduces movement after the RV is already parked and level. These are separate tasks that use different gear and happen in a specific order. Using stabilizer jacks to level the RV does not work – the jacks are not designed for that load – and it can bend or crack the mounting brackets, stress the frame, and leave the rig still off-level no matter how much force is applied.
The gear that levels your RV and the gear that stabilizes it are not interchangeable. Understanding the difference before you buy anything saves time, money, and equipment.
This guide explains the difference, covers what each type of gear actually does, walks through the correct setup order, and identifies the mistakes that cause the most problems. It applies to travel trailers, fifth wheels, motorhomes, Class B vans, and truck campers. If you already understand how leveling and stabilization work and want to compare specific products, the best RV leveling blocks and stabilizers buying guide covers the main options by rig type and use case.
Jump To
How This Guide Works
The explanations and recommendations here are based on product research, manufacturer guidance, RV setup principles, technical specifications, and common owner feedback. This is not a hands-on product test. No gear was independently evaluated in a controlled setting.
The goal is to help you understand how leveling and stabilization work so you can set up correctly, choose the right gear for your situation, and avoid the mistakes that send most new owners to forums in frustration. Where your RV manufacturer’s instructions differ from anything in this guide, follow the manufacturer. RV designs vary significantly, and your owner’s manual is the authoritative source for your specific rig.
Leveling vs. Stabilizing: The Difference That Matters
Leveling is about angle. When an RV is parked on ground that is not perfectly flat – which describes almost every campsite – the rig will sit tilted to one side, pitched forward, or both. Leveling gear corrects that tilt. Leveling blocks, curved drive-on ramps, and automatic leveling jacks all do the same basic thing: change the height of one part of the RV relative to another until the floor is flat. This has to happen first, before anything else, because everything downstream depends on it.
Stabilizing is about movement. Once the RV is level and parked, there is still the problem of the rig rocking, bouncing, or swaying when people walk around inside, when wind pushes against the side, or when someone climbs the entry step. Stabilizer jacks, X-chocks, king pin tripods, and brace systems are trying to solve this problem – not the leveling problem. They do not change the angle of the RV. They add contact points with the ground that resist movement.
| Gear | Used for Leveling? | Used for Stabilizing? | Main Job | Common Mistake |
|---|---|---|---|---|
| Stackable leveling blocks | Yes | No | Raise the low-side tire to correct side-to-side angle | Stacking beyond the weight rating for the loaded rig |
| Curved levelers | Yes | No | Drive-on ramp that raises the low-side tire | Poor fit with tight tandem axle spacing |
| Wood blocks | Yes | No | Low-cost shims under tires or jacks | Splitting under load; moisture absorption over time |
| Wheel chocks | No | Partially | Prevent the RV from rolling – safety equipment first | Skipping chocks before unhitching a trailer |
| X-chocks | No | Partially | Reduce lateral rocking between tandem tires | Using them as a substitute for wheel chocks |
| Stabilizer jacks | No | Yes | Reduce bounce and sway in an already-level RV | Using them to lift or level the RV |
| Jack pads | No | No | Spread jack load on soft or uneven ground | Skipping them on grass or gravel and finding the rig off-level by morning |
| Automatic leveling system | Yes | No | Hydraulic or electric jacks that level the RV automatically | Ignoring ground conditions; skipping jack pads on soft sites |
Chocking Is a Third Category
Wheel chocks are often grouped with leveling and stabilization gear but belong in their own category. Chocks prevent the RV from rolling. They are safety equipment. They go on before you unhitch, before you do anything else, and they stay on until you are ready to move. A trailer that rolls when unhitched is a serious hazard, and chocking is the only reliable way to prevent it.
Jack Pads Are Support, Not Leveling
Jack pads are flat plastic or rubber platforms placed under the feet of stabilizer jacks or leveling jacks on soft or uneven ground. Their job is to spread load over a wider surface area so jacks do not sink into grass, sand, or gravel. They support the jacks – they are not leveling tools and not stabilization tools on their own. A rig that is perfectly level at setup on soft ground may be visibly off-level by morning if jack pads were skipped and the feet slowly sank overnight.
Why Leveling Your RV Matters
An unlevel RV is not just uncomfortable. Several systems depend on the rig sitting at a reasonable angle, and some will perform poorly or fail outright if the tilt is significant enough.
Absorption Refrigerators
Older RV refrigerators that operate on a propane and electric absorption cycle require the unit to be close to level to function correctly. The cooling process relies on gravity-driven fluid circulation, and that circulation becomes disrupted when the RV sits more than a few degrees off-level. Running an absorption fridge significantly off-level for extended periods can permanently damage the cooling unit – a repair that is expensive and often not worth it on an older refrigerator. Newer compressor-style refrigerators are more tolerant of tilt, but they are still inside a rig where everything else suffers when unlevel.
Doors, Cabinets, and Slide-Outs
Cabinet doors that stay closed on a level surface will swing open on an unlevel one. Entry doors that open and close smoothly when level may stick or refuse to latch when the frame is racked. This happens because RV structures flex just enough when unlevel to change how doors align with their frames. Slide-outs are more sensitive still – extending a slide on an unlevel RV puts uneven lateral stress on the mechanism, the seals, and the frame mounting points. Over repeated use, this causes accelerated wear and eventual misalignment.
Sleep and Daily Comfort
Most people can detect a tilt of less than one degree when lying down. Even minor off-level conditions that seem acceptable while standing become obvious after an hour in bed. Plumbing and drainage also function better when the RV is level – holding tanks drain more completely, water drains from sinks without pooling, and water heaters operate as designed. None of these become catastrophic after one unlevel night, but the cumulative effect of consistently ignoring level matters for long-term maintenance and comfort.
Why Stabilization Matters
A level RV that still rocks and bounces is frustrating in a different way. The leveling problem has been solved, but the living experience still feels unsettled – and this is where stabilization does its work.
Travel trailers are particularly prone to movement because of how they are built. The chassis flexes. The suspension absorbs bumps but also allows vertical movement when weight shifts. When someone walks from the bedroom to the kitchen, the trailer responds. When two people are moving in different directions at the same time, it compounds. The specific type of movement varies by rig – single-axle trailers tend to bounce fore and aft, tandem-axle trailers rock side to side, fifth wheels develop movement concentrated at the king pin end when unhitched.
Good stabilization reduces movement to a manageable level. It does not make a travel trailer feel like a stick-built house, and expecting that outcome leads to buying more gear than necessary and still being disappointed.
What a properly stabilized rig achieves is a trailer that does not visibly rock when someone sits down on the couch. That is a meaningful, noticeable improvement over an unstabilized setup – even if some residual movement remains on softer ground or in lighter trailers.
The Correct RV Setup Order
The sequence matters as much as the gear. Setting up in the wrong order is how equipment gets damaged and how owners end up re-doing the entire process from the beginning.
Step One: Choose Your Position First
The first decision happens before the RV stops moving. Walk the site or drive through it slowly and identify the flattest available position. Every foot of ground-level correction you can avoid is gear you do not have to deploy. A site that looks flat may have a subtle slope that only becomes apparent once you pull in – use a level or a leveling app before committing to a position if the site looks borderline.
Step Two: Level Side to Side at the Tires
Side-to-side level comes first, corrected at the tires by driving onto blocks or a curved leveler placed under the low-side wheels. Check level with the RV still hitched. Adjust block height and drive on again until the side-to-side level is correct.
Step Three: Chock Before You Unhitch
Chock the wheels immediately – fore and aft of at least one set of tires – before doing anything else. For a trailer, unhitch only after the wheels are chocked. An unchocked trailer can roll as soon as tongue jack pressure is removed, particularly on any site with a grade.
Step Four: Level Front to Back
Front-to-back level comes after chocking, using the tongue jack on a travel trailer, the landing gear on a fifth wheel, or the nose-down jacks on a motorhome. This is independent of the side-to-side correction and can be dialed in precisely once the tires are already on the correct blocks.
Step Five: Place Jack Pads, Then Deploy Stabilizers
Jack pads go down before stabilizer jacks come out. If the ground is soft, grassy, or sandy, place pads under each stabilizer jack foot before extending them. Then extend all four corner stabilizer jacks to firm ground contact – snug, not cranked hard enough to lift the tires. Lifting the tires transfers load to the stabilizer jacks in a way they are not designed to handle and makes the RV less stable, not more.
Step Six: Extend Slide-Outs per the Manual
Slide-outs extend after the rig is level, or in the sequence the manufacturer specifies. Some RVs require leveling before slides go out. Others have a specific ordered sequence for which slides extend first. The owner’s manual for your specific rig is the only reliable guide here – this is not an area where general advice overrides model-specific instructions.
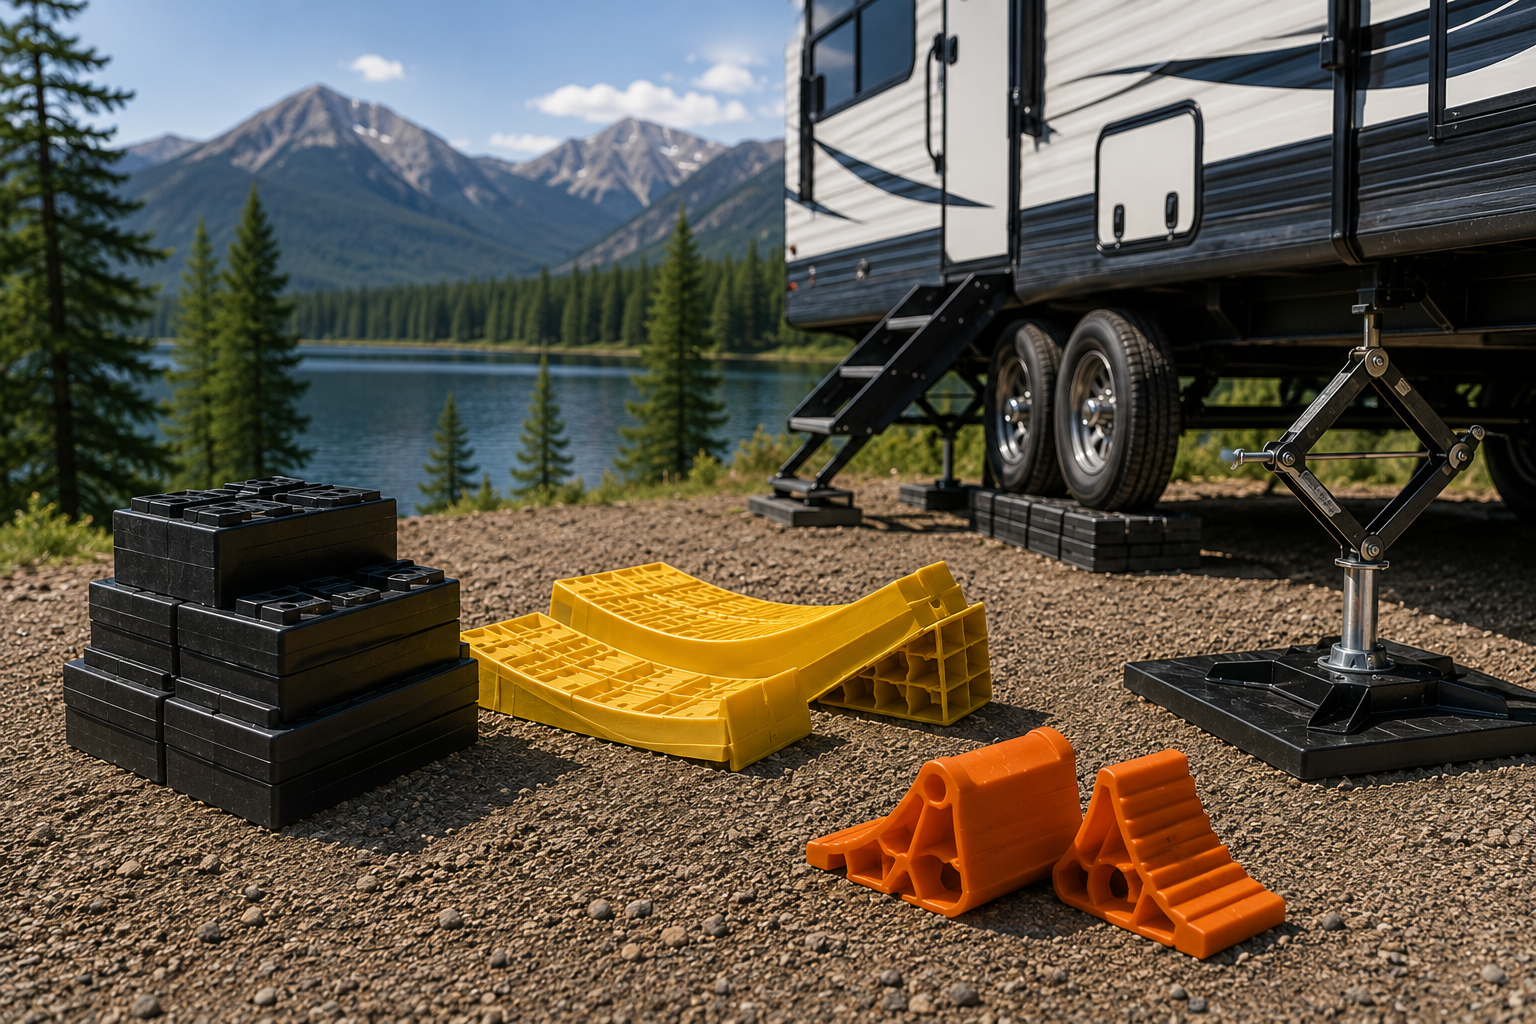
Types of RV Leveling Gear
Leveling gear corrects the angle of the RV. It lives under the tires or under the leveling jacks, and it is in place before stabilizers ever come out. The right choice depends primarily on rig type, typical correction amount, and how often you are setting up on genuinely uneven sites.
Stackable Leveling Blocks
Interlocking plastic leveling blocks are the most common solution for travel trailer and fifth wheel owners. Stack them in front of the low-side tires, drive forward until the RV reads level, then stop and chock. They handle corrections up to four to six inches depending on stack height, store flat, and are easy to clean. The tradeoff is setup time – finding the right stack height often takes a few attempts on a new site. Weight ratings vary by brand and decrease as stack height increases, so checking the rating against your loaded rig weight is not optional.
Curved RV Levelers
Curved drive-on ramps are a single-piece plastic leveler shaped like a gradual ramp. Position one in front of the low-side tire, drive forward until the bubble reads level, stop, and chock. No stacking, no guessing. For single-axle trailers and rigs where the correction needed is modest, they are often faster than stackable blocks by a significant margin. The complication arises with tandem axle trailers – tight axle spacing can make curved levelers awkward to position correctly under the front tire without being blocked by the rear. Storage bulk is also greater than a flat stack of interlocking blocks.
Wood Blocks
Cut sections of treated lumber have been the low-tech leveling solution for as long as RVs have existed. They work, they are cheap, they can be cut to any height, and they are available everywhere. The practical downsides are equally real: wood is heavy, splits over time under repeated load, absorbs moisture and eventually warps, and creates a storage problem because irregular shapes do not stack cleanly. Many experienced RVers keep a few wood pieces as a supplement for shimming under jacks on very uneven surfaces, but most move away from wood as a primary leveling system after a season or two.
Jack Pads
Typically eight-to-twelve-inch square plastic platforms, jack pads spread stabilizer or leveling jack load over more surface area and keep the foot from sinking into soft ground. On firm pavement they are optional. On grass, gravel, sand, or wet ground they are a necessary part of the setup – not a luxury addition.
Automatic Leveling Systems
Many Class A motorhomes and some higher-end fifth wheels and trailers include hydraulic or electric automatic leveling systems. Press a button, the system reads the angle, extends the appropriate jacks, and stops when level is achieved. Convenient, but not foolproof. Ground conditions still matter – auto-leveling jacks sink into soft soil just as readily as manual ones. Some sites are too severely sloped for the system’s correction range. And the correct sequence for slides, jacks, and other systems still depends on the manufacturer’s instructions, not the general procedure for a different brand’s setup.
Types of RV Stabilization Gear
Stabilization gear reduces movement after the rig is already level and parked. Each type addresses a specific kind of movement, and understanding what each does – and what it cannot do – prevents both overbuying and underbuying.
Stabilizer Jacks
Corner stabilizer jacks are the standard starting point for trailer stabilization. Most travel trailers and fifth wheels come from the factory with four scissor-style stabilizer jacks, one at each corner. They extend downward to contact the ground and resist vertical movement at that corner. Factory jacks are functional but basic – slow to manually crank and often less rigid than aftermarket options. Electric stabilizer jacks, which deploy and retract with a drill or dedicated controller, are a popular upgrade for frequent campers who want faster setup and pack-up. What they are not, under any circumstances, is lifting jacks. Stabilizer jacks are contact devices, not load-bearing devices.
Wheel Chocks
Wheel chocks are safety equipment before they are stabilization equipment. Their primary purpose is preventing the trailer from rolling – a potentially serious accident, not just an inconvenience. Standard wedge-style chocks placed fore and aft of at least one set of tires fulfill this purpose and also contribute to fore-aft stabilization by limiting tire movement. Every trailer owner needs at least one set of chocks in their kit regardless of what other stabilization gear they carry.
X-Chocks and Between-Wheel Stabilizers
X-chocks are scissor-style devices that fit between tandem axle tires and expand outward to create lateral tension against both tires simultaneously. The tension resists the rocking motion that tandem axle trailers produce as weight shifts side to side inside. Owners typically report a noticeable reduction in rocking, and X-chocks are considered one of the higher value-per-dollar upgrades for tandem axle configurations. They are not a substitute for wheel chocks – X-chocks do not prevent rolling and are not rated as parking safety devices. They also have no meaningful effect on single-axle trailers, which have no second tire to tension against.
King Pin Tripods for Fifth Wheels
When a fifth wheel is unhitched from the truck, the king pin end is supported only by the landing gear – two legs near the front of the trailer. A king pin tripod provides a third contact point under the king pin area, turning a two-point support into a three-point support and reducing front-end bounce and sway. The improvement on firm, level ground is real. For full-timers and frequent campers who regularly unhitch for multi-day stays, it is a worthwhile addition. For occasional campers who unhitch briefly, it is lower priority.
Permanent Stabilizer Brace Systems
Aftermarket brace systems attach directly to the trailer frame and provide structural rigidity that factory jacks and X-chocks cannot match. They are most relevant for full-timers, frequent campers who find standard stabilization leaves more movement than they can tolerate, or owners of trailers known for flexibility issues. They represent a meaningful upgrade in stabilization quality but are not the first thing to reach for when starting out.
Step Stabilizers
Entry step stabilizers are small braces that reach from the step down to the ground, preventing the step from flexing or bouncing under foot pressure. They address a specific, targeted problem effectively. They do not stabilize the trailer overall – a trailer with a stabilized step and nothing else done to the corner jacks or chocks will still rock. Step stabilizers are a quality-of-life addition that belongs at the end of the list, not the beginning.
What You Need by RV Type
Setup priorities shift considerably depending on what type of RV you are working with. The same approach that works for a tandem axle travel trailer is not the right approach for a Class B van or a truck camper.
| RV Type | Leveling Priority | Stabilization Priority | Practical Setup |
|---|---|---|---|
| Small single-axle travel trailer | High | Medium | Stackable blocks or curved leveler, wheel chocks, corner stabilizer jacks, jack pads on soft ground |
| Tandem axle travel trailer | High | Medium-High | Stackable blocks, wheel chocks, X-chocks between tires, four-corner stabilizer jacks, jack pads |
| Fifth wheel | High | High | Stackable blocks, landing gear for front-to-back, four-corner stabilizer jacks, king pin tripod for extended stays, jack pads |
| Class B van | Medium | Low | Small leveling wedges or a few stackable blocks; wheel chocks; separate stabilizer jacks rarely needed |
| Class C motorhome | High | Medium | Built-in leveling jacks plus blocks for larger corrections; jack pads on soft ground; rear stabilizer jacks if equipped |
| Class A motorhome | High | Medium | Auto-leveling system with jack pads on soft sites; follow manufacturer sequence; blocks for sites beyond system range |
| Truck camper | Managed via truck | Low | Level the truck using blocks under the truck’s tires; stabilizer jacks on camper corners if equipped; jack pads on soft ground |
Small Single-Axle Travel Trailers
The most sensitive to leveling because lighter weight means more dramatic response to tilt. A set of stackable blocks or a curved leveler handles most leveling situations. Standard wheel chocks, corner stabilizer jacks, and jack pads on soft ground round out the kit. The movement problem is noticeable – there is no second axle to dampen fore-aft bounce – but factory stabilizer jacks are adequate when properly deployed on a level rig.
Tandem Axle Travel Trailers
Everything in the single-axle kit, plus X-chocks between the tires. The tandem configuration reduces fore-aft bounce significantly but introduces more side-to-side rock, and X-chocks are the right tool for that specific problem. More weight generally means more benefit from jack pads on any ground that is not solid pavement.
Fifth Wheels
Share most setup needs with tandem axle trailers, with the addition of the king pin stability issue for extended unhitched stays. The landing gear handles front-to-back leveling in place of a tongue jack. King pin tripods are worth adding for anyone who regularly unhitches for more than a day or two at a time.
Class B Vans
The simplest setup of any RV category. The van body is structurally rigid, the footprint is small, and the leveling correction needed is usually modest. Small leveling wedges or a few stackable blocks under the low-side tires handle most situations. Separate stabilizer jacks are rarely needed.
Class C and Class A Motorhomes
Lean on built-in leveling jacks for most of the work, supplemented by blocks under the tires for larger corrections. The stabilization situation is generally better than for trailers because the chassis is more rigid. Jack pads matter whenever soft ground is a possibility, regardless of whether the leveling system is manual or automatic.
Truck Campers
The camper moves with the truck, so leveling is achieved by leveling the truck – blocks under the truck’s tires, not the camper itself. Stabilizer jacks on the camper corners help when parked, and jack pads apply on soft ground as with any other rig.
For readers building a complete first-trip kit, the RV accessories guide covers leveling and stabilization gear alongside other essential setup items in one place.
Manual RV Leveling: A Simple Campsite Walkthrough
The theory becomes straightforward in practice once the sequence is clear. Here is what a typical manual setup looks like for a tandem axle travel trailer arriving at a developed campsite.
Before You Stop
Use a level app or a bubble level on the countertop with the trailer still hitched to identify which side is low. Position leveling blocks or a curved leveler in front of the low-side tires. Pull forward slowly – a spotter is helpful – until the side-to-side level reads correct. Overshoot the blocks and you are starting over, so go slowly on the final approach.
Chock, Then Unhitch
Chock the wheels before doing anything else. Front and rear of at least the drive-side tires, firmly wedged. Once chocked, disconnect from the tow vehicle. Lower the tongue jack gradually until it takes the weight off the hitch ball, then disconnect safety chains, breakaway cable, and electrical connection before fully separating from the truck.
Level Front to Back, Then Stabilize
With the trailer unhitched and chocked, adjust the tongue jack to bring the front-to-back level into range. Check with a level placed lengthwise in the trailer. Place jack pads under each stabilizer jack foot if the ground is anything other than hard pavement. Extend all four corner stabilizer jacks to firm ground contact – snug, not lifting the tires. Install X-chocks between the tandem tires. Walk through the trailer, check the level, open and close a few cabinet doors. If anything feels wrong, it is faster to fix it now than after the awning is out and the chairs are set up.
Motorhome Leveling: What Changes
Motorhomes handle leveling differently from trailers, and the differences matter because the stakes of getting it wrong – particularly with hydraulic leveling systems – involve more expensive equipment.
Auto-Leveling Works Within a Range
Most systems can correct for moderate slopes, but severely uneven sites exceed what the jacks can reach. When that happens, the system either stops at its limits or, on older systems, continues to try and damages a jack. The right response on a severely sloped site is to reposition the motorhome before running the leveling sequence, not to let the system fight the ground.
Ground Conditions Still Matter
Hydraulic leveling jacks have small feet that sink into soft or wet soil. Jack pads under each foot on questionable surfaces prevent the slow overnight settling that turns a level setup into an off-level wake-up. This step is often skipped on motorhomes with auto-leveling because the button-press convenience makes manual ground prep feel unnecessary. The physics of soft soil do not care how automated the leveling system is.
Follow the Manufacturer’s Sequence
The sequence for slides and leveling varies by manufacturer and model in ways that are not consistent across the industry. Some motorhome manufacturers require the leveling sequence to be completed before any slides extend. Running the sequence incorrectly on some rigs causes the auto-leveling system to recalculate mid-process when slide weight shifts the chassis. Follow the owner’s manual sequence specifically – not the general procedure for a different brand’s system.
Common Setup Mistakes
Most leveling and stabilization mistakes follow recognizable patterns. Knowing them in advance makes them easier to avoid.
Using Stabilizer Jacks to Level the RV
This is the most common mistake and the one with the most potential for damage. Stabilizer jacks are not rated for the lateral forces involved in leveling. They bend, crack at the mounting brackets, or fail at the weld points. The RV also does not actually get level this way – stabilizers have limited range of motion and are too short to make meaningful angle corrections.
Forgetting to Chock Before Unhitching
A trailer without wheel chocks can roll as soon as tongue jack pressure is removed, particularly on any site with a grade. This is a safety issue, not just a setup inconvenience. Chocking takes thirty seconds. There is no good reason to skip it.
Buying Gear Without Checking Compatibility
Curved ramp-style levelers work well on single-axle trailers and some tandem configurations but do not fit all tandem axle spacings. Stackable blocks have weight ratings that decrease with stack height. Jack pads have surface area requirements that vary with ground softness. None of these details are obvious from a product photo. Measure your rig and check the specs before purchasing.
Setting Stabilizers Before Leveling
Stabilizers deployed before the rig is level hold the RV in an off-level position. Correcting it afterward requires retracting all stabilizers, re-leveling, and redeploying – the long way around a problem that correct sequencing avoids entirely.
Using X-Chocks as Wheel Chocks
X-chocks are not rated as parking safety devices. They will not reliably hold a trailer on a grade. They go between the tires after standard wheel chocks are already in place.
Extending Slide-Outs Without Checking the Manual
The correct leveling-to-slides sequence varies by manufacturer. Assuming the sequence is the same across brands leads to problems – slide mechanism stress, seal wear, and in some cases auto-leveling systems that recalculate and partially retract jacks mid-process.
Overbuying Before the First Trip
X-chocks, king pin tripods, brace systems, and step stabilizers are all real solutions to real problems. They are also solutions to problems you may or may not have. Camp first, then identify what actually needs fixing. The gear list assembled from forums before your first trip will rarely match the problems you actually encounter.
When Basic Blocks Are Enough
Not every setup requires a complete kit of specialized gear. A set of stackable leveling blocks sized for your rig’s loaded weight, a set of wheel chocks, and jack pads for soft ground covers the fundamentals for the majority of developed campground situations. The factory corner jacks handle stabilization adequately if the rig is properly leveled first and the jacks are deployed correctly.
Weekend campers who use established campgrounds, single-axle trailer owners with modest correction needs, Class B van campers, and anyone still in their first season of RV ownership can reasonably start here and upgrade only when they identify a specific problem that the basic kit is not solving. The goal is not a fully equipped rig on day one – it is understanding which problems you actually have.
When It Is Worth Upgrading
Upgrading makes sense when recurring, specific problems have been identified and basic gear has proven inadequate for them. The upgrade decision should follow the camping experience, not precede it.
Frequent travel – multiple trips per month – justifies faster gear. Curved levelers or electric stabilizer jacks pay back their cost in setup time when you are doing it repeatedly. Uneven gravel or grass sites that consistently require significant corrections justify better leveling gear. Tandem axle trailer owners experiencing persistent rocking that chocks and factory jacks are not reducing adequately should add X-chocks before considering anything more involved. Fifth wheel owners who regularly unhitch for extended stays are the primary audience for king pin tripods. Full-timers and heavy rigs represent the highest-use cases where the full range of leveling and stabilization gear justifies itself.
For product-specific comparisons matched to different rig types and camping situations, the RV leveling blocks and stabilizers buying guide covers the main options without padding.
Buying Advice Without Overbuying
The practical starting kit for most new RV owners is straightforward: leveling blocks appropriate for your rig’s loaded weight, wheel chocks, and jack pads if you will be camping on anything other than hard pavement. That handles the fundamentals and leaves room to identify what, if anything, actually needs to be added after real-world experience.
The common overbuying pattern is assembling a complete kit before the first trip based on forum recommendations – X-chocks, curved levelers, electric jacks, step stabilizers, a king pin tripod – and then discovering that half of it was not needed for the type of camping actually being done. The right setup depends on three things: the type of RV, the typical campsite terrain, and the owner’s tolerance for movement and setup time. None of those are fully knowable before the first few trips. Buy the basics, camp, find the real problems, then address them specifically.
Frequently Asked Questions
Do I need leveling blocks if I have stabilizer jacks?
Usually yes. Stabilizer jacks are contact devices designed to reduce movement in a rig that is already level – they are not designed to correct the angle of the RV. If the site is uneven enough that the tilt is noticeable, leveling blocks or another leveling method are needed to correct it before the stabilizers go down.
Can I use stabilizer jacks to lift my RV?
No, with rare exceptions. Standard factory stabilizer jacks are not rated for lifting loads. Using them to lift the RV for a tire change or maintenance risks bending the jack arms, cracking the mounting brackets, or creating an unstable situation where the rig can fall. Use a hydraulic floor jack rated for the rig’s weight. The only exception is if the manufacturer specifically states in the owner’s manual that the leveling jacks on that model are rated for lifting – which applies to some heavy-duty motorhome systems but not to trailer stabilizer jacks.
Are X-chocks enough to stabilize a travel trailer?
X-chocks address one specific type of movement – lateral rocking between tandem tires – and they do it well. They are not a complete stabilization system, they do not replace wheel chocks, and they have no effect on single-axle trailers. They belong in the kit alongside wheel chocks and corner stabilizer jacks, not instead of them.
Are curved levelers better than stackable blocks?
For single-axle trailers and rigs where the correction needed fits within the ramp’s range, curved levelers are usually faster and simpler. For tandem axle trailers with tight axle spacing, stackable blocks are often a better fit because each tire can be addressed independently. Curved levelers also require more storage space. Neither is universally better – the right choice depends on axle configuration, typical correction amount, and storage constraints.
Should I level before or after extending slide-outs?
Follow your RV manufacturer’s manual. Many manufacturers recommend leveling first, then extending slides. Some have a different required sequence. The wrong order can stress slide mechanisms or cause auto-leveling systems to recalculate mid-process. Your owner’s manual for your specific rig and model year is the authoritative guide.
How level does an RV need to be?
For most systems and comfort purposes, within about half a bubble on a standard level is a reasonable practical target. Older absorption refrigerators are the most sensitivity-critical component and may have tighter tolerances specified in the appliance manual. Manufacturer guidance for your specific appliances should override general rules of thumb.
If You Only Remember This
- Leveling and stabilization are different jobs. Leveling corrects angle and happens first. Stabilization reduces movement and happens after the rig is level. Using stabilizer jacks to level the RV does neither job and risks damaging equipment.
- Chocks are safety equipment, not optional. They go on before you unhitch, before any other setup step, and they stay on until you are ready to move.
- Sequence matters as much as gear. The right gear used in the wrong order produces the same result as the wrong gear. Level first. Chock before unhitching. Stabilize last.
- Jack pads are not a luxury. On soft, wet, or grassy ground, they are what keeps a level setup level by morning.
- Start simple and upgrade based on real problems. The basic kit – leveling blocks, chocks, jack pads – handles the fundamentals for most developed campground situations. Add X-chocks, tripods, and brace systems when you have experienced the specific problem they solve.
- Follow your manufacturer’s manual. Slide-out sequences, leveling system procedures, and jack load ratings vary by rig. Generic advice – including this guide – does not override what your owner’s manual specifies for your specific model.