Field guide · Thetford, Dometic, SeaLand
RV Toilet Won't Flush? 6 Causes and Fixes, in Order
No water when you press the pedal, a bowl that won't hold water, or a flush that won't drain: here is what to check first and how to fix it.
On this page
How an RV toilet flushes
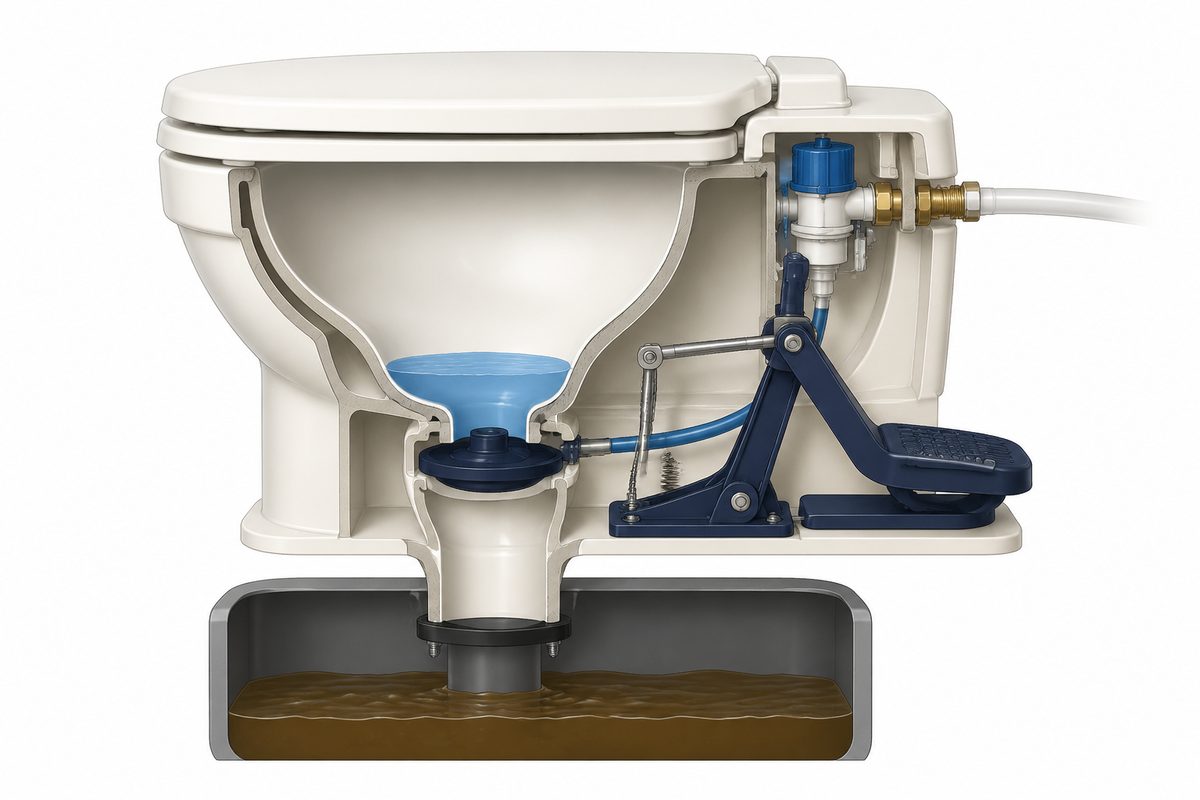
An RV toilet has no tank behind it and no trap: water comes straight from the fresh water system under pressure, and waste drops through a blade valve into the black tank below. Thetford, Dometic, SeaLand and most gravity-flush RV toilets work the same way.
- Half-press the pedalThe water inlet valve opens.
- Water fills the bowlUp to flushing level.
- Full pressThe blade valve at the bottom of the bowl opens.
- Waste drops to the holding tankGravity does the work.
- Release the pedalThe blade closes and seals.
- Some water stays in the bowlIt keeps the blade seal moist and blocks sewer gas.
| What happens | Where to look |
|---|---|
| Pedal goes down, no water comes in | 1. Water supply or 3. Water valve |
| Bowl empties between uses, sewer smell | 2. Blade seal |
| Pedal stiff, or both stages happen at once | 3. Pedal mechanism |
| Bowl fills but drains slowly or not at all | 4. Clog or pyramid plug |
| Gurgling and odor through the bowl | 5. Full tank or blocked vent |
| Odor at the base, rocking toilet, damp floor | 6. Base seal |
Five quick checks first
- Water supply. Does a faucet run? If nothing flows anywhere, check the fresh tank, the 12V pump switch, or the city water connection.
- Black tank level. A full tank creates backpressure. If the monitor reads full, or the last dump was more than about 5 days ago in warm weather, dump first.
- Pedal feel. Press slowly by hand. You should feel two distinct stages: a soft first stage for water and a firmer second stage for the blade.
- Water in the bowl. Water that won’t drain points downstream. A bowl that empties and stays dry points to the blade seal.
- Floor around the base. Moisture, staining or soft spots mean the base seal is leaking. That takes priority, because it quietly rots the subfloor.
The 6 causes, in order of likelihood
No water supply
Symptom: the pedal goes all the way down and no water enters the bowl.
Half-press the pedal and listen for water. If there’s nothing:
- Fresh tank empty or pump off when you’re not on city water. Listen for the pump when you press the pedal.
- City water problem: hose not fully connected, campground valve closed, or pressure below about 25 PSI, which may not open the toilet valve reliably.
- Shut-off valve closed: a quarter-turn valve on the supply line behind the toilet or in a nearby panel.
- Frozen line: thaw it with a hair dryer on low. Never use an open flame near water lines.
Blade valve or seal failure
Symptom: the bowl won’t hold water, empties between uses, and sewer smell comes up.
The blade seal wears out, typically after 3-6 years of regular use, leaving a gap that drains the bowl and lets tank gases back up. It’s the most common RV toilet repair and one of the easiest.
- Drain test: fill the bowl with the pedal, don’t flush, and check after 15 minutes. If the level dropped, the seal leaks.
- Look: with a flashlight, check the blade sits flush on the seal ring, with no trapped debris, cracks or warping.
Water valve or pedal mechanism
Symptom: the pedal is stiff, skips a stage, or no water flows on a half press.
Hard-water scale builds up in the valve seat, the spring weakens, or the plastic linkage wears.
- Scale: pour about 1/4 cup of white vinegar into the water inlet at the back of the toilet, wait two hours and flush several times. Better flow means scale was the problem; repeat monthly in hard-water areas.
- Valve: disconnect the supply line at the toilet, hold it over a bucket and have someone half-press the pedal. If the line flows freely but the toilet doesn’t fill, the valve is blocked or failed.
- Linkage: with the water off, press the pedal and watch the mechanism through the access opening for broken tabs, loose springs or stuck pivots.
Clogged drain or pyramid plug
Symptom: the bowl fills normally but drains very slowly or not at all.
A standard clog sits in the short drop between the bowl and the tank. A pyramid plug is worse: a solid mound of waste in the tank right under the toilet, built up when the tank valve stays closed for long periods or too little water is used per flush. It makes the toilet look broken when the problem is in the tank.
- Drop clog: nothing goes down, or it drains for a moment when the blade opens and then stops.
- Pyramid plug: it starts draining, then slows and stops; the tank reads fuller than it should for the time since the last dump.
Clearing a pyramid plug: fill the bowl, hold the blade open with a wedge against the pedal, add a cup of liquid dish soap and let water volume and time work, refilling several times over 20-30 minutes. For a stubborn plug, a holding-tank wand through the toilet opening ($15-25) is the effective tool.
Full tank or blocked vent stack
Symptom: slow draining, gurgling, sewer odor back through the bowl.
The black tank needs room and a way for air to escape through the roof vent. Tank sensors often misread because of buildup on the probes, so also go by time: two people in warm weather typically fill a 30-gallon black tank in about 4-5 days.
For the vent, check the pipe on the roof (usually 1.5-2 inches) with a flashlight. Wasp and mud dauber nests are the most common blockage. Clear it with a long brush or snake, and fit a vent cap screen ($6-12) to prevent the next one.
Base seal or flange failure
Symptom: odor at the base, a toilet that rocks, moisture or staining on the floor.
It won’t stop the toilet flushing, but it’s the most expensive one to ignore: months of moisture rot the plywood or particle-board subfloor, turning a $20 seal into a $1,500-4,000 floor repair.
- Paper towel test: lay paper towels around the base and flush several times. Any dampness confirms the leak.
- Rock test: any side-to-side movement means loose bolts or a failed seal.
- Fix: water off, disconnect the line, remove the 2-4 base bolts, lift the toilet and replace the gasket or wax ring ($8-25, matched to your model). About 45 minutes.
The annual 10-point check
- Use RV-safe toilet paper (test: shake a few sheets in a jar of water; they should break up quickly)
- Never flush wipes of any kind
- Keep 2-3 inches of water in the bowl to protect the blade seal
- Dump the black tank before it passes about two-thirds full
- After each dump, add water and a little dish soap to help prevent buildup
- Inspect the blade seal yearly for cracks, stiffness or trapped debris
- Lubricate the pedal pivots and blade linkage with silicone spray, not WD-40
- Check the roof vent stack each spring for nests
- Check the toilet base for rocking or moisture after rough travel
- Use an enzyme-based tank treatment during the camping season
| Item | Typical cost | Notes |
|---|---|---|
| Blade seal kit | $8-22 | Model-specific |
| Water valve / flush mechanism | $20-45 | Modular replacement |
| Enzyme tank treatment (6 months) | $18-28 | Monthly in season |
| Silicone lubricant spray | $6-10 | Yearly |
| Vent stack cap screen | $6-12 | One-time |
| Tank cleaning wand | $15-25 | Reusable |
| Base seal or wax ring | $8-25 | Model-specific |
Prevention: under $50 a year. A typical RV toilet service call: $150-350.
When to stop and call a technician
Frequently asked questions
Why won't my RV toilet hold water?
The blade seal at the bottom of the bowl is worn or has debris under it. Fill the bowl, wait 15 minutes without flushing, and if the level drops, replace the blade seal kit for your model (about $8-22).
How do I clear a pyramid plug in an RV black tank?
Fill the bowl, hold the blade open, add a cup of liquid dish soap and let water volume work over 20-30 minutes, refilling several times. For stubborn plugs, use a holding-tank wand through the toilet opening.
Can I use a plunger on an RV toilet?
Only gently. A forceful plunge can push the blade valve off its seat permanently. Rely on water volume and gentle pressure instead.
Are flushable wipes safe for RV toilets?
No. Wipes, including ones labeled flushable, reach the holding tank intact and are a leading cause of clogs and pyramid plugs. Use RV-safe toilet paper only.
Why does my RV toilet gurgle or smell when I flush?
Usually a full black tank or a roof vent stack blocked by a nest. Dump the tank and check the vent pipe on the roof with a flashlight.
Safety and disclaimer. This guide is general information, not professional advice. Work on propane, gas and electrical systems carries real risk; when in doubt, stop and call a qualified RV technician, and always follow your unit's service manual. If a carbon monoxide or propane alarm goes off, get everyone out of the RV first. How we research.